Build an Instant GraphQL Server with Apito - From Localhost to Cloud in Minutes
Building a GraphQL server from scratch traditionally requires setting up databases, configuring servers, writing resolvers, and managing deployments. What if you could skip all that complexity and have a production-ready GraphQL API running in the cloud within minutes? With Apito's instant API builder and API management platform, that's exactly what you can do.
In this guide, we'll build a complete GraphQL server for a modern blog application, deploy it to the cloud, and have it ready for production use - all in under 10 minutes.
Why Choose GraphQL with Apito?
Unlike traditional backend development, Apito's API management platform provides:
- Instant API Builder - Create GraphQL tools and REST API tools with no code required
- Visual Database Designer - Build API tools to design complex database API schemas with drag & drop
- Real-time Subscriptions - Built-in WebSocket support
- Auto-generated Documentation - GraphiQL explorer included
- One-click Cloud Deployment - From localhost to production instantly
- Built-in Authentication - JWT, OAuth, and custom auth strategies
Step 1: Set Up Your Apito Project (2 minutes)
Create Your Account
Head to Apito Console and sign up for a free account. Once logged in, you'll see your project dashboard.
Initialize Your Project
- Click "Start a new Project"
- Choose "Empty Project" for maximum flexibility
- Enter your project details:
- Project Name: "Instant Blog API"
- Description: "A complete GraphQL blog server built in minutes"
- Select "Apito Cloud" for managed database hosting
- Click "Create Project"
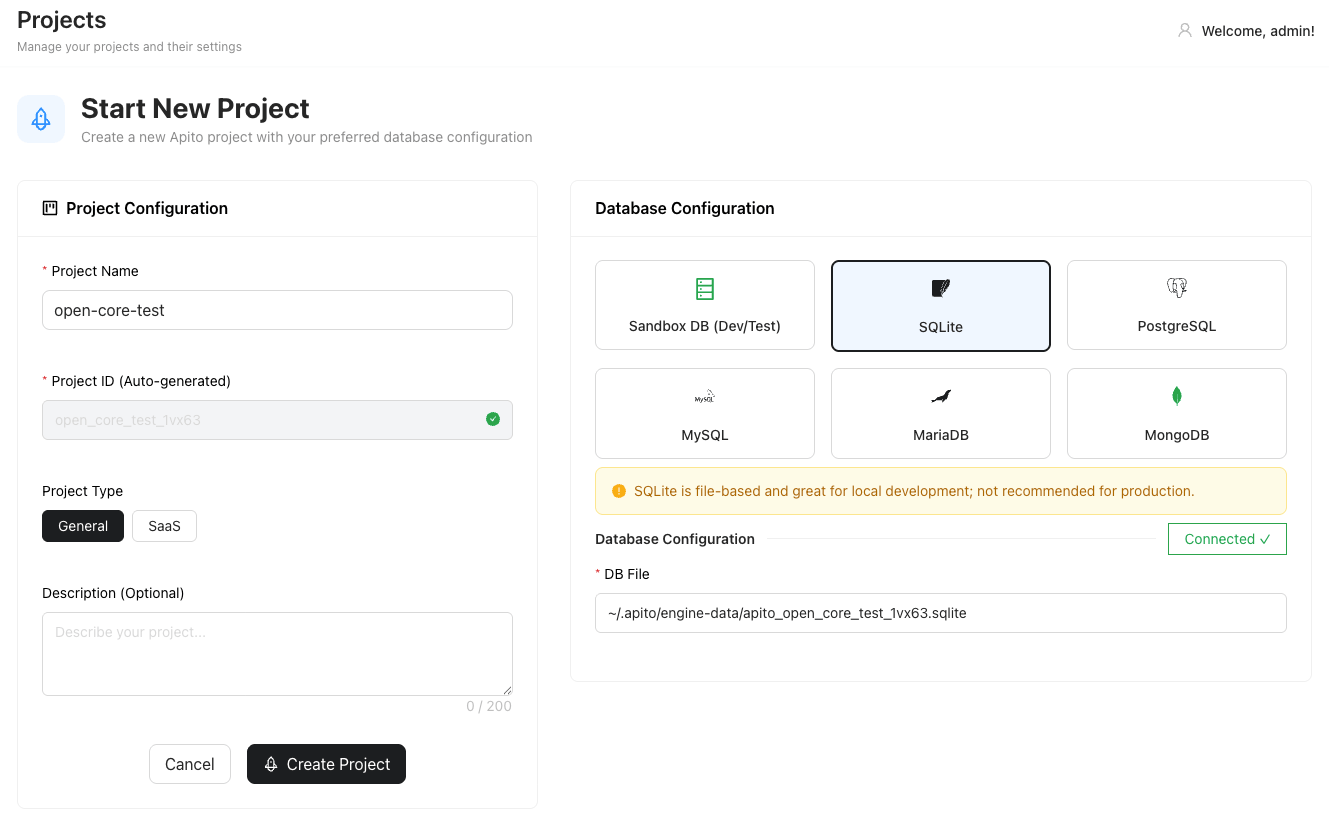
Your project will be ready in seconds, complete with a managed database and GraphQL endpoint!
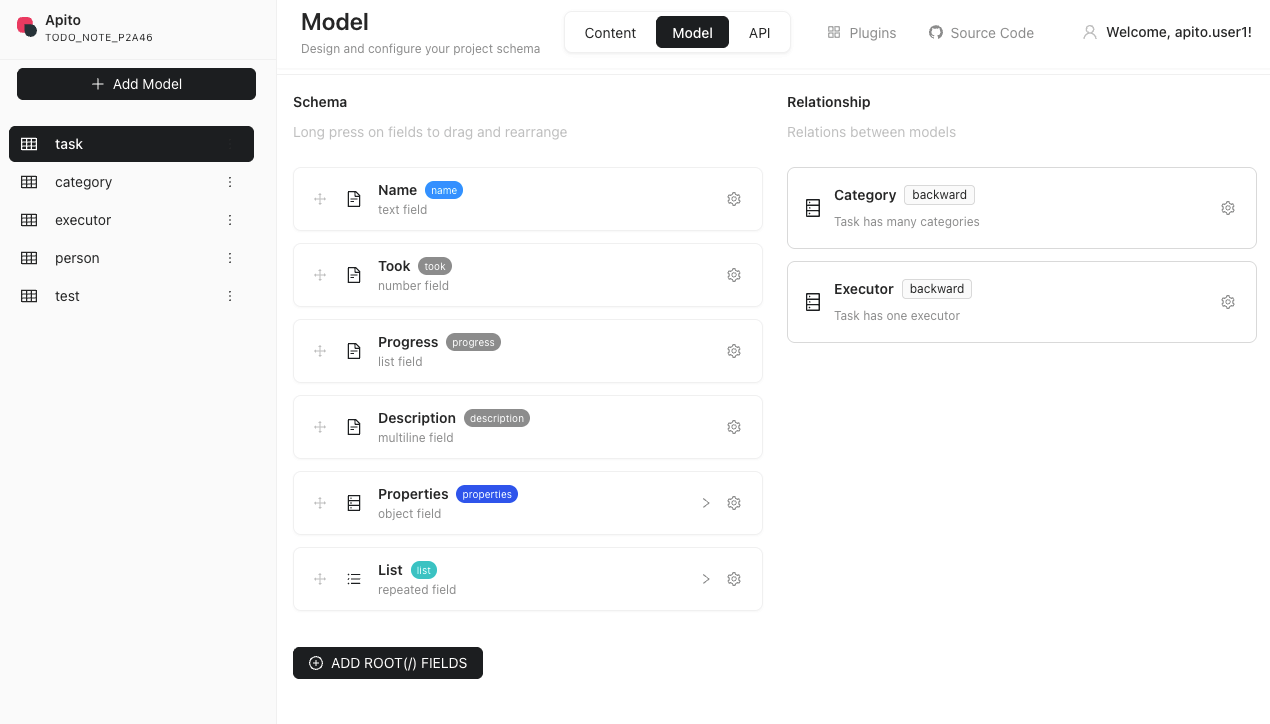
Step 2: Design Your Database Schema (3 minutes)
Now let's create a comprehensive blog schema with multiple related models.
Create the Author Model
- Navigate to Models in the top menu
- Click "Add a Model" and name it
Author - Add these fields:
name(Text, Required)email(Email, Required, Unique)bio(Rich Text)avatar(Media)socialLinks(JSON)isActive(Boolean, Default: true)
Create the Category Model
- Add another model named
Category - Add these fields:
name(Text, Required)slug(Text, Required, Unique)description(Text)color(Text)icon(Media)
Create the Post Model
- Create a
Postmodel with these fields:title(Text, Required)slug(Text, Required, Unique)content(Rich Text, Required)excerpt(Text)featuredImage(Media)status(Enum: draft, published, archived)publishedAt(DateTime)readTime(Number)tags(JSON Array)
Create the Comment Model
- Add a
Commentmodel:content(Rich Text, Required)authorName(Text, Required)authorEmail(Email, Required)isApproved(Boolean, Default: false)createdAt(DateTime, Auto-generated)
Step 3: Define Relationships (1 minute)
Now let's connect our models with powerful relationships:
Author-Post Relationship
- In the
Postmodel, add a Relation field - Name it
author, link toAuthormodel - Set relationship: Many Posts belong to One Author
Category-Post Relationship
- In the
Postmodel, add another Relation field - Name it
categories, link toCategorymodel - Set relationship: Many Posts have Many Categories
Post-Comment Relationship
- In the
Commentmodel, add a Relation field - Name it
post, link toPostmodel - Set relationship: Many Comments belong to One Post
Step 4: Add Sample Content (2 minutes)
Let's populate our database with sample data:
Add Authors
- Go to Contents → Author
- Click "Add a new Author"
- Fill in sample data:
{
  "name": "Jane Developer",
  "email": "[email protected]",
  "bio": "Full-stack developer passionate about GraphQL and modern web technologies",
  "socialLinks": {
    "twitter": "@janedev",
    "github": "janedev",
    "linkedin": "jane-developer"
  }
}
Add Categories
Create categories like:
- Web Development (slug: web-development)
- GraphQL (slug: graphql)
- Cloud Computing (slug: cloud-computing)
Add Posts
Create sample blog posts linking to your authors and categories.
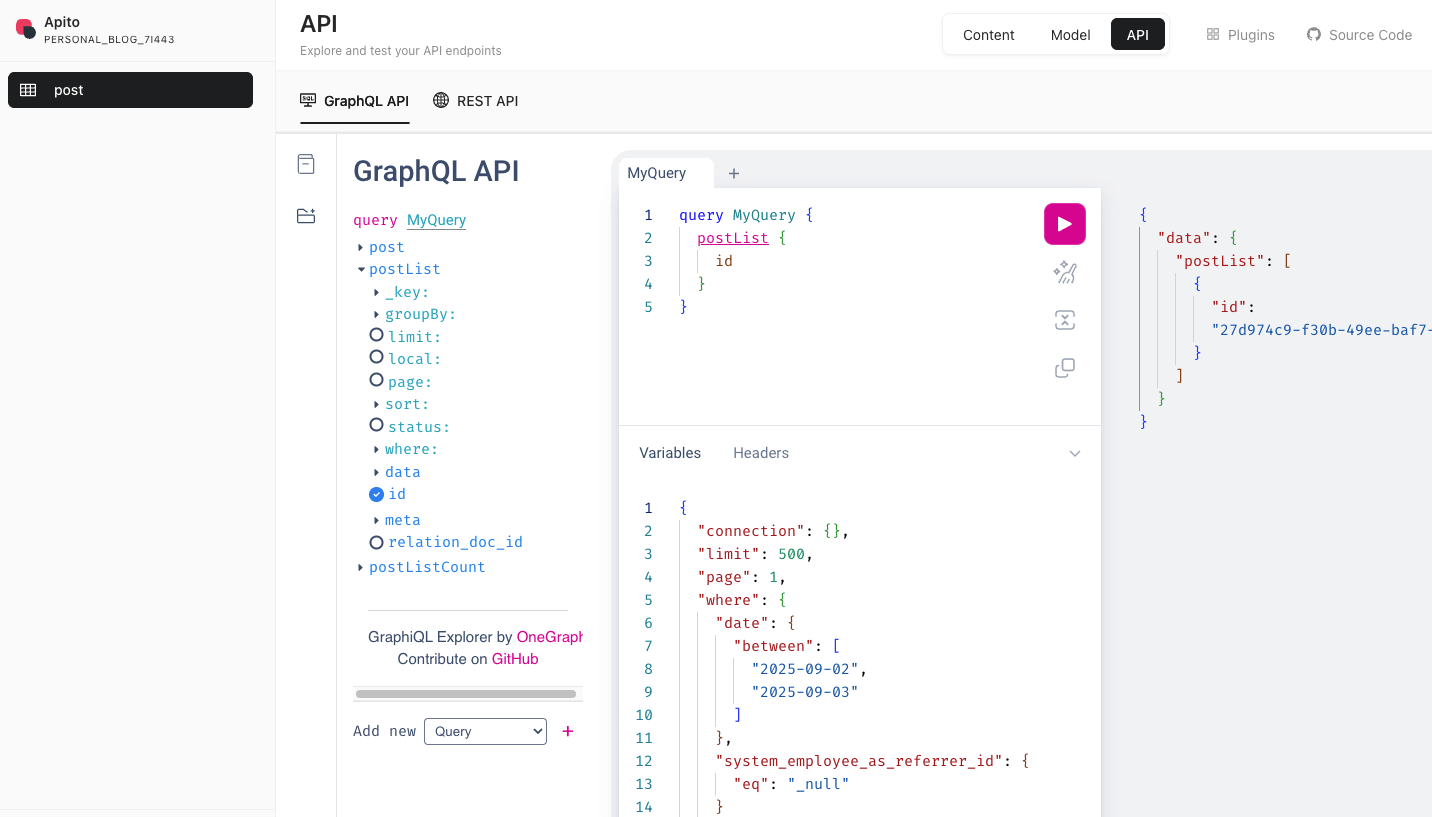
Step 5: Explore Your Instant GraphQL API (1 minute)
Your GraphQL server is already live! Let's test it:
Access GraphiQL Explorer
- Navigate to API → GraphiQL Explorer
- Your endpoint is automatically generated and secured
Try These Queries
Fetch all posts with authors and categories:
query GetAllPosts {
  posts {
    id
    title
    slug
    excerpt
    status
    publishedAt
    readTime
    author {
      name
      email
      avatar
    }
    categories {
      name
      slug
      color
    }
    comments {
      content
      authorName
      isApproved
      createdAt
    }
  }
}
Search posts by category:
query PostsByCategory($categorySlug: String!) {
  posts(where: { categories: { slug: { _eq: $categorySlug } } }) {
    title
    excerpt
    featuredImage
    author {
      name
    }
  }
}
Real-time subscription for new comments:
subscription NewComments {
  comments(where: { isApproved: { _eq: true } }) {
    content
    authorName
    post {
      title
    }
    createdAt
  }
}
Step 6: Cloud Deployment - Already Done! (0 minutes)
Here's the magic: Your API is already deployed to the cloud!
- ✅ Production-ready endpoint: Instantly available
- ✅ Global CDN: Sub-100ms response times worldwide
- ✅ Auto-scaling: Handles traffic spikes automatically
- ✅ SSL/HTTPS: Secure by default
- ✅ Monitoring: Built-in performance tracking
- ✅ Backups: Automated daily backups
Get Your Production Endpoint
- Go to Settings → API Endpoints
- Copy your GraphQL endpoint:
https://api.apito.io/graphql/your-project-id - That's it! Your API is production-ready
Step 7: Integrate with Your Frontend
React Integration Example
import { ApolloClient, InMemoryCache, gql, useQuery } from '@apollo/client';

const client = new ApolloClient({
  uri: 'https://api.apito.io/graphql/your-project-id',
  cache: new InMemoryCache(),
  headers: {
    'Authorization': 'Bearer YOUR_API_KEY' // From Apito Console
  }
});

const GET_POSTS = gql`
  query GetPosts {
    posts(where: { status: { _eq: "published" } }) {
      id
      title
      excerpt
      slug
      featuredImage
      author {
        name
        avatar
      }
      categories {
        name
        color
      }
    }
  }
`;

function BlogPosts() {
  const { loading, error, data } = useQuery(GET_POSTS);

  if (loading) return <div>Loading amazing content...</div>;
  if (error) return <div>Error: {error.message}</div>;

  return (
    <div className="blog-grid">
      {data.posts.map(post => (
        <article key={post.id} className="blog-card">
          <img src={post.featuredImage} alt={post.title} />
          <h2>{post.title}</h2>
          <p>{post.excerpt}</p>
          <div className="author">
            <img src={post.author.avatar} alt={post.author.name} />
            <span>{post.author.name}</span>
          </div>
          <div className="categories">
            {post.categories.map(cat => (
              <span key={cat.name} style={{backgroundColor: cat.color}}>
                {cat.name}
              </span>
            ))}
          </div>
        </article>
      ))}
    </div>
  );
}
Next.js Integration
// pages/api/posts.js
import { ApolloClient, InMemoryCache, gql } from '@apollo/client';

const client = new ApolloClient({
  uri: 'https://api.apito.io/graphql/your-project-id',
  cache: new InMemoryCache(),
});

export default async function handler(req, res) {
  const { data } = await client.query({
    query: gql`
      query GetPosts {
        posts { id title content author { name } }
      }
    `,
  });

  res.status(200).json(data.posts);
}
Advanced Features You Get for Free
1. Real-time Subscriptions
Your GraphQL server includes WebSocket subscriptions out of the box:
subscription LiveComments {
  comments(where: { post: { id: { _eq: "123" } } }) {
    content
    authorName
    createdAt
  }
}
2. Advanced Filtering & Pagination
query SearchPosts($search: String!, $limit: Int!, $offset: Int!) {
  posts(
    where: {
      _or: [
        { title: { _ilike: $search } }
        { content: { _ilike: $search } }
      ]
    }
    limit: $limit
    offset: $offset
    order_by: { publishedAt: desc }
  ) {
    id title excerpt
  }
}
3. File Upload Support
mutation UploadFeaturedImage($file: Upload!) {
  uploadFile(file: $file) {
    id
    url
    filename
  }
}
4. Built-in Authentication
mutation LoginUser($email: String!, $password: String!) {
  loginUser(email: $email, password: $password) {
    token
    user {
      id
      name
      email
    }
  }
}
Performance Metrics: Localhost vs Cloud
| Feature | Local Development | Apito Cloud |
|---|---|---|
| Setup Time | ~2 hours | ~5 minutes |
| Database Setup | Manual config | Instant |
| GraphQL Server | Code from scratch | Auto-generated |
| Deployment | Complex CI/CD | Already deployed |
| Scaling | Manual | Auto-scaling |
| Security | Manual | Built-in |
| Monitoring | Additional tools | Included |
Production Checklist ✅
Your Apito GraphQL server comes production-ready with:
- Database Optimization: Automatically indexed queries
- Caching: Redis caching layer included
- Rate Limiting: Prevent API abuse
- Data Validation: Schema-based validation
- Error Handling: Structured error responses
- API Documentation: Auto-generated docs
- Monitoring: Performance metrics dashboard
- Backups: Automated data backups
- SSL: HTTPS encryption
- CORS: Configurable cross-origin policies
What You Just Accomplished
In just 8 minutes, you've built and deployed:
🚀 A complete GraphQL server with complex relationships
🌐 Global cloud deployment with auto-scaling
📊 Real-time capabilities with WebSocket subscriptions
🔒 Production-grade security and authentication
📈 Performance monitoring and analytics
🔄 Automated backups and disaster recovery
Next Steps
Now that your GraphQL server is live, consider these enhancements:
- Add Authentication: Implement user registration and JWT tokens
- Set up Webhooks: Trigger actions on data changes
- Enable Caching: Configure Redis for faster responses
- Add Custom Logic: Write serverless functions for complex business rules
- Monitor Performance: Use built-in analytics to optimize queries
Conclusion
Traditional backend development can take weeks or months. With Apito, you've just built a production-ready GraphQL server and deployed it to the cloud in minutes. No servers to manage, no complex deployments, no infrastructure headaches - just a powerful API ready to scale with your application.
Whether you're building a blog, e-commerce site, mobile app, or SaaS platform, Apito gives you the backend foundation to move fast and focus on what matters: creating amazing user experiences.
Ready to build your next GraphQL server in minutes? Start your free Apito project today and experience the future of backend development.
Want to learn more about GraphQL best practices or explore Apito's advanced features? Check out our documentation or join our community Discord for real-time support from our team and fellow developers.

Fahim Shariar
Developer and founder of Apito. Passionate about building tools that make API development faster and more enjoyable.